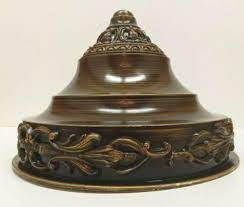
A vintage rain lamp is an ornamental electric lighting fixture that evokes the impression of falling water. It is often cylindrical in shape and has a metal top and base.
It usually features a figurine, like Aphrodite or Venus, surrounded by plastic foliage. It also has a motor that pumps oil to the lamp’s top through a web of fishing line filament.
Table content
If you’re looking to restore a vintage rain lamp, there are several things you need to know. They’re decorative electric lights that use a motor to pump oil, which then runs down a web of fishing line to give the impression of rain. These lamps were a popular item until the 1980s, but they’re making a comeback now that people are interested in bringing rustic aesthetics into their homes.
The best way
- to get started is to unplug the lamp and place it on a flat surface. Cover the area with plastic sheeting and a few towels to keep it dry while you work on it.
- To disassemble a rain lamp, start by removing the electrical cord and chain that hold the bottom of the lamp to the center portion of the lamp. This will allow you to access the brass acorn nuts that hold the oil reservoir and lamp pump assembly to the bottom of the lamp.
- After the acorn nuts are removed, you can remove the lamp’s top canopy by unscrewing its two screws. You’ll need to take care when doing this because it could easily fall off if you’re not careful.
- Next, you’ll need to remove the light bulb, statue, and foliage from the lamp. This will allow you to reach through the strands and make repairs, such as replacing a broken monofilament line.
You can also clean the lamp with a mixture of bleach and laundry detergent. This will help to dissolve any leftover oil and grease, resulting in a cleaner lamp.
Another option is to use a small brush with white vinegar to remove any remaining residue from the base of the lamp. This will keep the lamp from smelling and leaving residue on nearby surfaces.
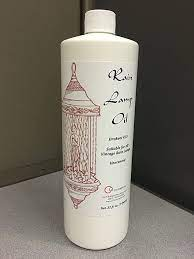
Lastly, you’ll need to replace the oil in your lamp. You’ll need to buy the right type of oil. The most common type is mineral oil, but you can also buy a cheaper alternative like alkane or glycerin, which will help you save money in the long run.
Parts Needed
A vintage rain lamp is a decoration accessory that adds an element of charm to a room. Their rarity makes them a great investment for collectors. They are also a great addition to the home as they impart a feeling of serenity and grace.
There are a number of parts
- needed to restore a vintage rain lamp, including the bulb, oil pump, and fishing line. These parts are easy to replace and can be found in hardware stores.
- The first part of the restoration process is to remove the old oil. To do this, you will need to carefully disassemble the lamp without causing any damage. Once the lamp is removed, you will need to set up a work area with plastic sheets and newspapers.
- Next, you will need to clean the parts thoroughly. This will help to prevent clogs and blockages that can cause the lamp to not function properly.
- Once you have cleaned all the parts, you will need to reassemble them. You will need to make sure that you have the correct screws and nuts for each part.
You will also need to reattach the monofilament line. This will require some re-threading of the lines to ensure that they are in the right position. This can be a time-consuming task, so be sure to allow plenty of time for the job.
During this process
- you will need to be careful not to break the lines, as they are fragile and can cause injury. Be sure to wipe the lines well with a paper napkin, as this will keep them from getting damaged.
- When reattaching the lines, you will need to be very careful not to pull on the ends of the strands, as this can cause them to break. If you need to reattach the ends of the strands, be sure to wrap them with a piece of tape or duct tape, so that they don’t get loose.
- After reattaching the lines, you will want to check the lamp again to make sure that everything is working correctly. If it isn’t, you will need to replace the parts that have been damaged and re-fill it with new oil or fluid.
Replacement Parts
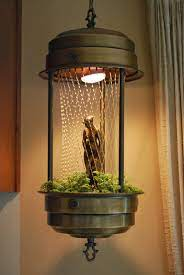
The top canopy of a vintage rain lamp houses strands of luminous nylon or polymer fishing line that shine when lit. The trick is in the pump, which silently distributes oil to the strands of fishline without generating too much noise or wasting energy.
A vintage rain lamp can be made from a wide variety of materials, including metal and wood. Some models use brass and other metals for their pillars and base while others are crafted from hardwoods like maple or oak. Often, they have a statuette in the center of their tops and a top and bottom that are held together by three pillars.
One of the most exciting
- things about these quaint lamps is that they are not as difficult to restore as you might think. They are not prone to overheating like newer models and can be easily replaced with the right parts.
- There are a number of different replacement parts for these old-fashioned kerosene or oil lamps. These parts include burners, collars, chimneys, wicks, and shade holders among other components.
- The best way to start is by taking inventory of the parts you have and figuring out what they need to function correctly. This will help you avoid spending money on parts you don’t need and save you time in the long run.
- The best part about this whole process is that you will probably be able to reuse the pieces you end up with. In fact, this process is likely to be the highlight of your restoration project. The only downside is that you will likely need a lot of time and patience to get the job done right.
Oil Replacement
Vintage rain lamps were popular during the 1950s, and they’re making a comeback in popularity. However, they’re not cheap, and if you want to own one, you should know how to care for it so you don’t damage it.
To help you out, here are some tips to keep in mind when it comes to adding oil to your vintage rain lamp:
The first thing
- that you should do is drain the oil from your rain lamp’s bottom pan. This will prevent it from overflowing, and also prevent you from wasting time and money on buying new oil.
- Next, place the lamp on a flat surface and line it with plastic or paper towels to prevent any oil spills from getting on your carpet or other surface. Once you’re ready to pour in the oil, you’ll need to do it a little at a time.
- Once the oil is added, wait for a while to see if the raining effect starts resuming. If it doesn’t, you should add more oil until it does.
Another important factor
- is the type of oil you use. Some vintage rain lamps are made of paraffin oil, while others use mineral oils. If you decide to use paraffin or mineral oils, make sure to get a high-quality brand that’s made specifically for these types of lamps.
- Some vintage rain lamps use Drakeol #35, which is a special oil that creates the best raining effects. If you’re using this oil, be sure to purchase the one-quart size.
- As an alternative, you can use mineral oil that’s available at most drug stores. This oil is also more affordable than Drakeol #35, and it’s better for you.
- If you’re unsure which oil to use, you can always ask a seasoned rain lamp collector for advice. They will tell you the right oil for your specific model of lamp. They can even tell you if your lamp needs additional maintenance or repair. For example, if it’s damaged due to overuse or abuse, you may need to replace the pump. This will require more time and effort, but it’s an essential part of maintaining your rain lamp.
Conclusion
Vintage rain lamps are decorative electric lighting fixtures that give the impression of falling rain. Usually cylindrical in shape, they have a metal top and base with a hidden motor at the base.
They feature a web of fishing line filaments surrounded by plastic floral foliage. The motor pumps oil over the strands of fishing line to produce the effect of rain.